Menu
| File | > | Financial Setup | > | Chart of Accounts | > | Chart of Accounts |
Mandatory Prerequisites
Prior to creating a Chart of Account, refer to the following Topics:
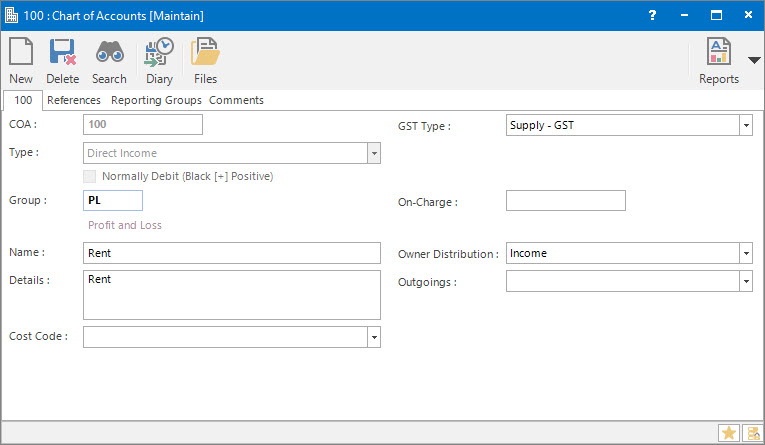
Screenshot and Field Descriptions: Chart of Accounts Tab
COA: this is the primary identifier for the Chart of Account (COA).
Type: this is a drop down list of accounting types for the COA:
- Direct Income: amounts earned by the business from the sales of goods and services to the customer, ie. typically rents from Tenants.
- Indirect Income: amounts earned by the business from areas outside the normal source of income, ie. bank interest.
- Cost of Sales: costs directly associated with producing the goods and services for the customer.
- Direct Expense: costs incurred by the business from the purchase of goods or services from a supplier.
- Indirect Expense: costs incurred by the business from areas outside the normal source of expenses.
- Current Asset: assets that can be converted quickly to cash, usually within a year.
- Non-Current Asset: assets that cannot be converted quickly to cash.
- Current Liability: debts, loans, trade credit or other obligations due for payment within a year.
- Non-Current Liability: outstanding debts that are owed by the organisation.
- Equity: investment made by the owners or stockholders of the business.
- Cash/Bank: balance sheet Cash or Bank accounts.
- Bond a/c Control, Sundry a/c Control, Lease a/c Control, Trust a/c Control: these are for the Debtors and Creditors Control COAs. Any of these types can be used for Debtors or Creditors Control depending on the setting in the Normally Debit check box. For example, if Lease a/c Control is selected and Normally Debit is ticked, the COA will be used as a Debtors Control account for Tenant (Lease a/c) transactions. If Lease a/c Control is selected and Normally Debit is not ticked, the COA will be used as a Creditors Control account for Landlord (Lease a/c) transactions.
- Profit & Loss Transfer: this is used for transferring the Profit (or Loss) across to the Balance Sheet at the end of the financial reporting year.
Normally Debit (Black [+] Positive): this check box is used to define the normal behaviour of the COA when using it on transactions lines, ie. Debit or Credit. Normal behaviour is defined as the most common occurrence. The system sets a default value based on the accounting type selected in the Type drop down list, as follows:
- No (ie. normally Credit) - Income (Direct, Indirect), Liability (Current, Non-Current), Equity, Profit & Loss Transfer, Creditor Control (Sundry a/c, Trust a/c).
- Yes (ie. normally Debit) - Expense (Direct, Indirect, Cost of Sales), Asset (Current, Non-Current), Cash/Bank, Debtor Control (Lease a/c, Bond a/c).
The accounting sign conventions for the system are Debit amounts are shown in black and stored in the database as positive amounts. Credit amounts are shown in red and stored in the database as negative amounts.
Details: this is the optional description that is used as a default value on Transaction lines when the COA is entered.
Cost Code: this drop down list is used to determine if the COA requires an accompanying Cost Code when entered on Transaction lines. The options are:
- Leave blank if no Cost Code should be entered.
- Optional: entry of the Cost Code is optional.
- Mandatory: a Cost Code must always be entered whenever this COA is used.
GST Type: this is a drop down list of GST types to be used as a default value on Transaction lines when the COA is entered. The options are:
- Leave blank if no GST type is required ie. Control, Cash / Bank accounts.
- GST types for Purchases (acquisition of goods and services):
- Acquisition - GST: for expense type COAs where GST can be claimed on purchases made.
- Acquisition - GST Capital Purchases: for expense type COAs where GST can be claimed on capital purchases made.
- Acquisition - GST Free: for expense type COAs where purchases made are not subject to GST.
- Acquisition - Input Taxed: for expense type COAs where the GST for purchases made can not be claimed as they are used to make input taxed sales.
- Acquisition - GST Account: for the COA that is going to be the GST control account to record the GST amount for purchases.
- Acquisition - Out of Scope: for expense type COAs where GST is not applicable.
- GST types for Sales (supply of goods and services):
- Supply - GST: for income type COAs where GST must be included in the sales made.
- Supply - GST Free: for income type COAs where sales made are not subject to GST.
- Supply - GST Export Sales: for income type COA where sales made are not subject to GST as they are exported supplies.
- Supply - Input Taxed: for income type COAs where the GST is not included in sales made even though GST was included in the price of the purchases used to make the sales.
- Supply - GST Account: for the COA that is going to be the GST control account to record the GST amount for sales.
- Supply - Out of Scope: for income type COAs where GST is not applicable.
On Charge: this is the default income COA to be linked with an expense COA for on-charging Creditor transactions to Tenant (Lease a/cs). It can be left blank.
Owner Distribution: this is a drop down list to specify if the COA is going to be included as Income or Expense in the Owners Distribution calculation. It can be left blank.
Outgoings: this is a drop down list to specify if the COA is a Statutory or Non-Statutory outgoings expense type for Outgoings calculations. It can be left blank.
Screenshot and Field Descriptions: Reporting Groups Tab
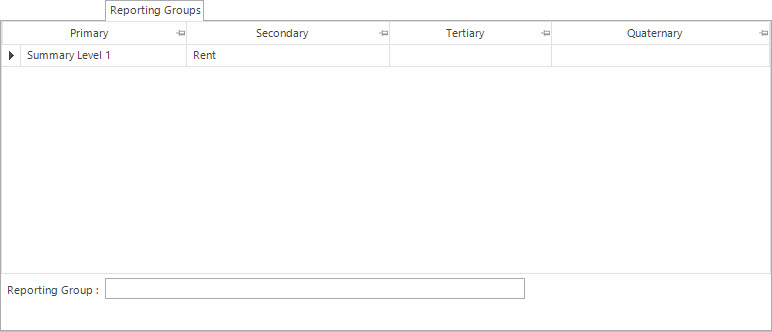
Reporting Groups table: this lists the Reporting Group levels the COA will be consolidated under on financial reports. Double click a row to populate the fields below the table for editing.
The values in the following fields can be Added, Changed and Deleted using the Maintenance Push-Buttons (Right Hand Side).
Shared or Site Optional Tabs
Other than Tabs described specifically in this Topic, the following may also be available (depending on Site Settings):
How Do I : Search For and Maintain Entities
These General Rules are described in the Fundamentals Manual: How Do I : Search For and Maintain Entities
How Do I : Add a new Chart of Account
Before a COA can be used, a COA Permit for the Division must be added. Refer to Maintaining Chart of Accounts Permits
How Do I : Modify an existing Chart of Account
How Do I : Delete a Chart of Account
A Chart of Account record can only be deleted if there are no records, such as Chart of Accounts Permits, associated with it.
Chart of Accounts are associated with the following Topics: